
Introduction/Preview
- SMS has very customizable opportunities to import any kind of values from any lab.
- The main set up might seem lengthy but it sets the stage for automation after setup complete.
- Make sure attributes (column headings) exist and are mappable (Tools>Attribute Editor)-one time procedure
- Arrange your preferred order of columns and attributes to be used (Tools>Management Item Editor>Operations>Soil Sampling)-one time procedure which comes in handy when importing from lab CSV files.
- Import a file with georeferenced sample locations, make it a soil sampling operation type and the columns above will be joined to the soil test location making a spreadsheet “ready to receive” lab data. –each time you bring in a soil sampling event
- Import lab file to join with soil sampling layer- first time setting up an import template to match lab columns with the “ready to receive” SMS database columns.
- Skip to page 5 for importing lab data to soil sampling layer.
- Alternatively, you might be provided with a “Shapefile” set that already has the sample locations and all soil test values within that shapefile. Skip to point 12, page 10 for these instructions.
Section 1: Making sure you have all the attributes you need for importing lab values
- SMS is prepopulated with a few hundred commonly used attributes. You cannot alter these, as they are part of the system, but you can tweak how or whether you will use them.
- Take great caution making a new attribute as they cannot be deleted once created and to avoid duplication.
- Got to Tools>Attribute Editor
- Select Soil Sampling from the attribute Group (Attributes are grouped according to their common use to subdivide the lengthy list).
- Select EACH of the attributes you intend to use, click EDIT from the dialogue box and make sure
That they have the “Mappable” and “Favorite” checked on. This will ensure the attribute is visible, able to be mapped and will pop up in certain short cut lists.

5. When you have worked through all of the soil sampling attributes you expect to use, make note of any not present and create these attributes. E.g. K to MG Ratio will not be found in the list.
In the select attribute box, choose Add New, Name it as a column heading> no punctuation and 8 characters or less. Assign to attribute group Soil Sampling, make sure it is a decimal and describe the units of measure> int this case it is a Ratio and the display units are (1) meaning no UOM. Again turn on Mappable and Favorite and click OK to save it permanently. Check carefully before saving.

6. Once attributes are available, we set up our preferred arrangement of soil sampling columns for our sampling operation. You do not have to use same order as your lab report. Customization allows you to select what columns you want to see left to right (important to lesser used?) and later we will train lab import to populate your desired arrangement.
a. Select Tools>Management Item Editor>Operation>Soil Sampling>Edit

b. In the Edit operation window there are two boxes> Left is what is available and right is what you have chosen to use. (This Available/Selected style of dialogue boxes is common through many areas of the program.)
b. I recommend you REMOVE ALL and then select your preferences from the Favorites list.
7. Once complete click OK and Close. You may edit or add columns at any time. Adding new columns will not change previously created soil sampling layers only those made from this point forward.
Method 1: Creating a Soil Sampling Layer, Ready to receive lab data
1. Import Shapefile that contains the grid point soil sample locations by selecting it from a file location.
2. A preview of the shapefile will be presented>next.

3. Pick the type of layer you are creating with this shapefile import>Soil Sampling

4. The “Assign columns” window shows you a preview of the columns in the incoming shapefile. All you really want here is the sample ID column because that is going to be the link to the lab file. From the top left select SAMPLE ID or whatever the sample id column is called and then select the ASSIGN COLUMN, select Use as Attribute and then select Soil Sample ID from the SMS attribute favorites list. OK to save.

5. Always choose No clipping, import Entire File.

6. Select or enter the information for this layer. It will default to this year and soil sampling etc once you have selected the grower farm and field into which you are importing.

7. The very bottom level of the management tree is what is called the Dataset Name. This is an excellent place to enter the Soil Report Reference Number. From the tree Highlight/Right click and select Edit Item from top of the pop up menu. Rename in a “Print Ready” format for future reference.

8. To view> Select the field name>Create new map and Select the soil sampling layer and ADD to current map.
9. You are now ready to import the lab data. With the Soil Sample points as the top/selected layer go to EDIT LAYER icon to open editing window. Select DATA GRID (top left) to see the soil sampling operation spreadsheet. The columns are ready to receive, but not yet populated.

Importing lab data into SMS
Introduction/Recap
- Prepare your lab CSV or dbf file for import. You do not HAVE to, but it is helpful to have a way and comfort with opening the lab file to check or see it.
- Import boundary and assign to appropriate grower/Farm/Field. Make sure to “Set as field boundary” or make “Frozen field boundary” on import.
- Import soil test locations map, declaring this as a soil sampling operation so that columns have been assigned ready to receive lab data.
- Move Boundary into new map window, add soil sampling operation to same map window.
- Start editing soil sampling layer.
Preparing the lab file for import
- The most common laboratory output is a .csv file, or comma separated values. This is the format used by both SGS, and A&L Laboratories in their online file download web portals. (Reports OnLine-SGS and DataWeb-A&L)
- These files are called “non-spatial files” because the geographic source is not present.
- If the format is from Excel, or a dbf or a txt file, open your lab file in Excel, get to know whether it has column headings and the order of the data.
- You can create a csv file by selecting FILE/SAVE AS, and navigate to the FILE TYPE “.CSV” and resave your file to this format.
Important Note: It does not matter what column order your lab uses, only that you have a CSV file to import into SMS.
Both Excel and Notepad are useful tools to open a lab file and get to know what it looks like.
The Standard A&L Import may have a number of unused columns depending on whether recs were requested. Many users find it helpful to open the lab file and routinely delete all columns from the extended columns. This is not necessary but it does ensure the same columns are being presented for import and this in turn allows us to create an import template.
Import templates only work when the incoming file has exactly the same columns.
Importing the non-spatial file
- With the Soil Sampling Editor open, select File>Import Non-spatial file, navigate to the csv select and open.

2. A csv import will default to the correct format and one header line. Select OK to continue
3. Select the correct linking attribute (SOIL SAMPLE ID) from the list of SMS attributes.Next>

4. Working from the optional items to import TAB, select each of the lab incoming columns that you wish to keep, with the logical “ready to receive” columns you set up in your soil sampling operation. Skip columns not required.
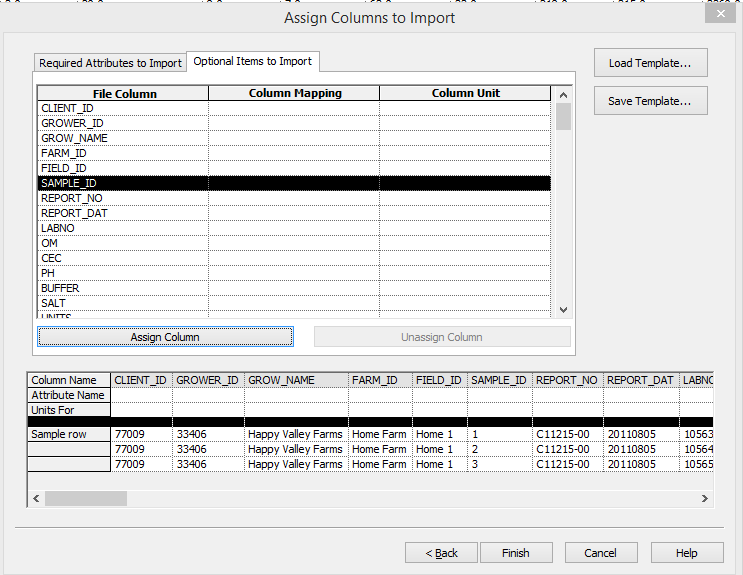
5. Starting with Sample ID (what the lab calls it) click Assign column. And match this with your SMS attribute name: Soil Sample ID (what SMS calls it).
6. As you work down the list you will notice that the preview bar on bottom starts containing the linked attributes.

7. As you match through, take care that the units of measurement are also correct. (ppm, % etc) They should auto populate, but always check.
8. The first time you see a particular incoming file type, you must do this assignment. Then you SAVE a template, so that on future imports of an identically constructed file, you will LOAD template and the match will be filled in for you. If even one column is different, the future file will have to be assigned. Labs consistently output same file structure so that this can be set up once, and future files will be automated.
9. Click finish to complete the import. In the data grid view you should see each of the assigned attributes populated with the lab values. SAVE to accept the import.

10. Return to the Map view and begin creating legends for each of your soil sample values.
11. Base values= original soil test points, Grid view=an interpolated surface mesh, contour=interpolated regions. The Grid view is the best analytical representation and is the view used in all analysis functions. To change the setting for the layer behaviour use Edit Layer Options. Explore Legend breaks and other style parameters.

Method 2: Importing Soil Samples from a Shapefile Containing Sample Data
Some service providers will present the end user with a set of shapefiles that already contains the lab data. In this case you will only need to import this file and all the data will come in. However, a slightly different import template will be required as the number of columns and order is likely different that the “lab import” format.
- Make sure all attributes needed have been created (see Section 1).
- Read Files>Select Read From Generic File Format and select shapefiles>
3. A preview of the shapefile will be presented>next.

4. Pick the type of layer you are creating with this shapefile import>Soil Sampling. NEXT>

5. The “Assign columns” window shows you a preview of the columns in the incoming shapefile. In this case you will want to assign many of the columns, so open optional items to import and work down the list of incoming data from the File column and assign it to the necessary attribute in SMS. From the top left select SAMPLE ID or whatever the sample id column is called and then select the ASSIGN COLUMN, select Use as Attribute and then select Soil Sample ID from the SMS attributes favorites list. Repeat through all Soil Test Attributes.
6. You can scroll left to right in the bottom panel which shows you the first three rows of your incoming file. After assigning a column you will see both eh SMS Attribute name and the incoming file column name.

7. Before you leave this window SAVE TEMPLATE so that the next time you have this format you can load the template and all columns will be assigned. FINISH> to complete the import.

8. Your soil sample data is now imported and you may proceed to display, apply legends, print or create recommendations.
Karon Tracey-Cowan, AgTech GIS
March 2020
